With these pan-roasted chicken thighs, you get really really crispy skin, lots of flavor, and juicy and tender meat from bone-in, skin-on chicken thighs.

Ah, chicken thighs. Overlooked, underrated and crazy delicious if you ask me. And pan-roasted chicken thighs are just about as good as it gets. I used to think I was the only one who preferred chicken thighs to chicken breasts. But then, I posted this how to post on roasting chicken thighs and it was actually one of my first viral posts on the blog! I couldn’t believe it.
There are countless ways to serve up chicken thighs including these, Apricot Braised Chicken Thighs With Traminette Wine & Thyme, Italian Baked Chicken Thighs With Garlic And Lemon, or Braised Apple Cider Chicken Thighs. If you prefer grilling your chicken thighs, you can also try this recipe which is a staple for us, Traeger Grilled Chicken Thighs (Bone-In).
There is no denying that most people prefer chicken thighs, we just don’t know how to cook them, especially bone-in, skin-on. They got a bad wrap in the 90’s when everything with a little bit of fat was deemed evil. But, now that we’re coming out of that hole, chicken thighs are well on their way to making a comeback.
INGREDIENTS & KITCHEN TOOLS
Let’s dive into the simple yet delicious ingredients you’ll need to make my chicken thigh recipe!
- Bone-in, skin-on chicken thighs (about 4-5 big thighs)
- Olive oil (1 tsp. per thigh), divided
- Paprika
- Garlic powder
- Onion powder
- Ground sage
- Sea salt
- Black pepper
STEP BY STEP | PREPARING & ASSEMBLING THE PERFECT CHICKEN RECIPE
Let’s dive into it! This recipe is super simple and comes together quickly with just a few ingredients, but the flavor and juiciness of the chicken will blow your mind!
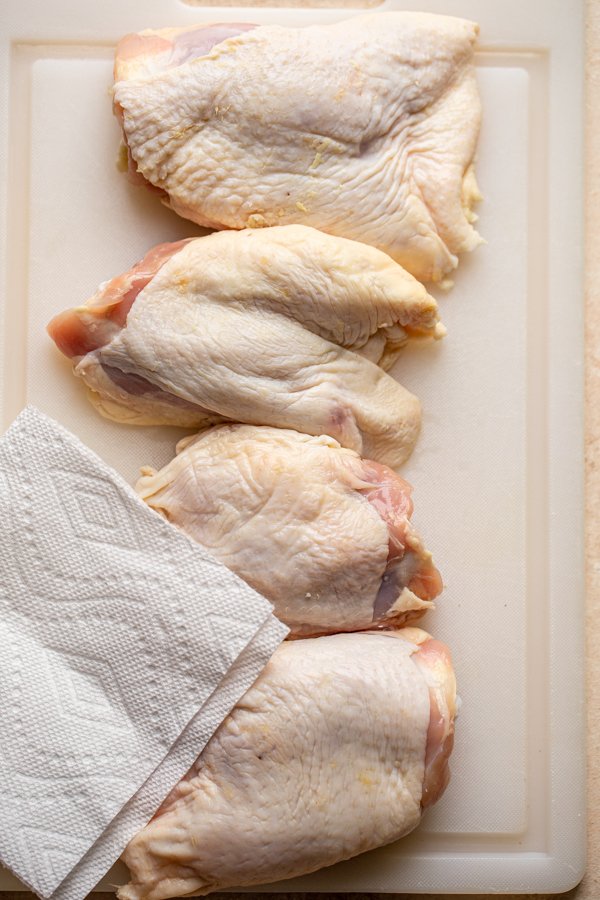
Step 1: Remove your chicken from the fridge and allow it to sit at room temperature for about 20 minutes. In the meantime, preheat your oven to 400 degrees F. Pat your chicken totally dry with a paper towel.
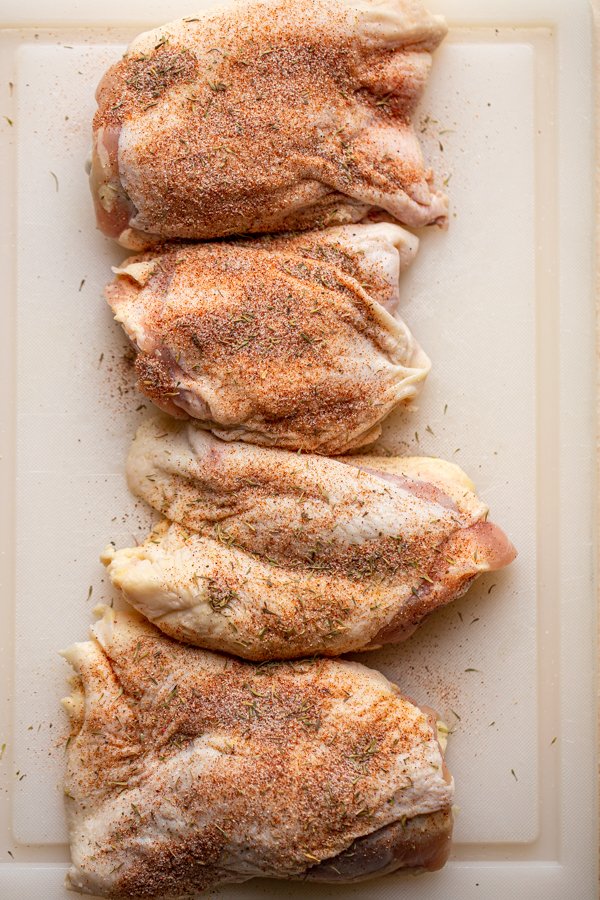
Step 2: Mix all of your spices together in a bowl.
Step 3: Drizzle your chicken with some olive oil and then sprinkle with the seasoning mix. Rub the spices into the chicken well.
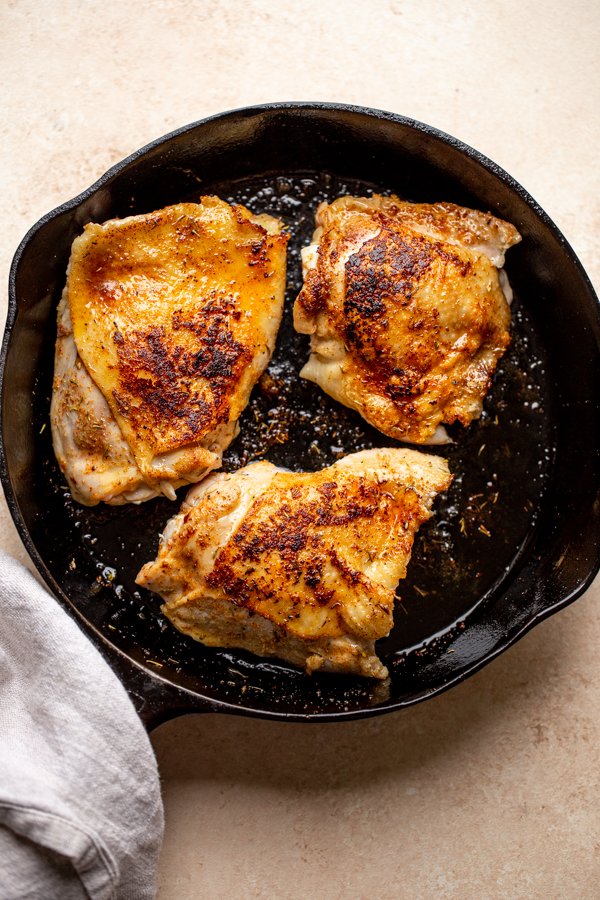
Step 4: Once your chicken is evenly coated and your pan is preheated, place your chicken into the pan, skin side down, in a single layer. Sear them for 5-7 minutes until they are nice and golden brown.
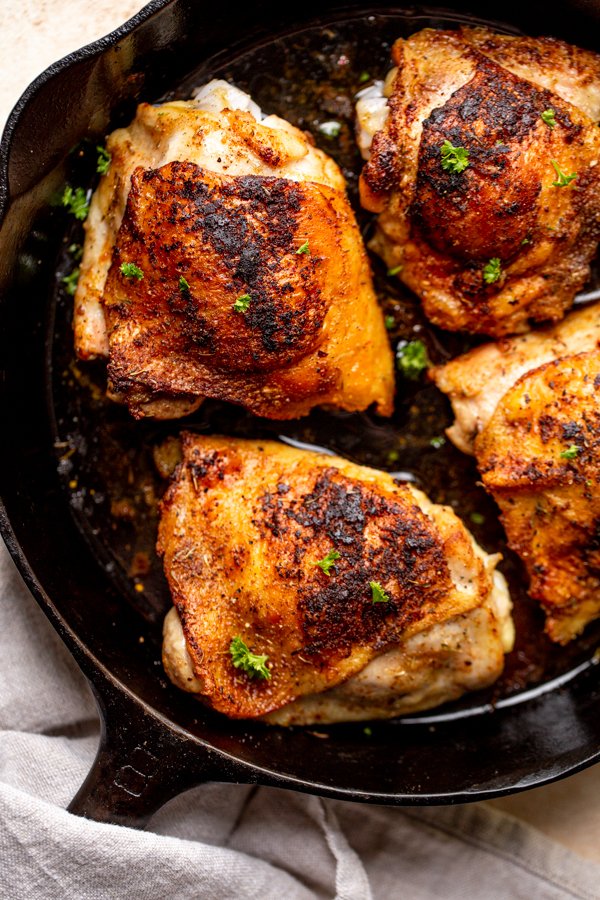
Step 5: Once the chicken is seared and the skin side is facing up, turn the stovetop burner off and slide the skillet into the oven (I recommend the middle rack).
Step 6: Bake for about 30 minutes, or until the chicken reaches an internal temperature of 165F. Rest for 10 minutes before serving! Enjoy!
TIPS & TRICKS FOR PERFECT PAN-ROASTED CHICKEN THIGHS
There are a few tips and tricks that I use for making sure my chicken thighs are super juicy and also crispy. Here we go:
- Bring the meat to room temperature – set your chicken out on the counter to come to room temperature about 20 minutes before you’re ready to cook. This is safe to do and helps with even cooking. You won’t end up with dry spots in some places and undercooked spots in others.
- Pat meat dry – take a paper towel and dab the chicken to make sure no moisture remains. Excess water can make your skin soggy and the chicken can stick to the pan.
- Pan sear your chicken thighs – by pan searing before roasting, you’re creating a layer of crust and texture.
- Don’t flip until the meat is ready to release – That being said, when pan searing, don’t flip the meat until it’s ready. If you go to flip it and it doesn’t give right away, let it sear a bit longer. Once a nice crust is formed it will flip easily.
HOW TO SERVE | PERFECTLY SEASONED AND BAKED CHICKEN THIGHS
These chicken thighs are the perfect protein to whip up for a quick and easy weeknight dinner and it can be served in a variety of ways. We love serving them with a side of rice or potatoes and some roasted vegetables, they are also delicious topped on a salad. I also have some side dishes that I recommend serving alongside these chicken thighs such as my Quinoa Tabbouleh Salad. You also can never go wrong with some Crispy Scored Potatoes or on top of my Italian-style avocado and tomato salad.
COMMONLY ASKED QUESTIONS
Bone-in, skin-on thighs vs. boneless skinless chicken thighs:
I prefer buying bone-in, skin-on chicken thighs for the following reasons:
- They’re juicer – cooking meat on the bone yields a juicier piece of meat because the meat is intact. There are fewer places for juices to run out, and you’re getting added tenderness from the bones as they seep collagen and marrow (this is good for you, too!). Leaving the skin on also encourages juices to stay inside of the meat during cooking.
- They’re crispier – if you cook skin right, it makes a really lovely, crispy layer on top of the meat. Say goodbye to boring chicken.
- You can save the bones and skin for homemade bone broth and stock – here’s the recipe I use!
What is pan roasting?
Ah so you may still be wondering what pan roasting is. Pan roasting is the technique used when you sear meat in a pan (make sure it’s oven safe – I like cast iron) and then finish cooking it in the oven. Sometimes, it’s called pan seared, too.
It’s really commonly used in restaurant cooking because you form a nice crust on the meat, start and speed up the cooking process, and then finish it (hands free) in the oven while you prepare the remainder of the meal.
Pan roasted chicken thighs aren’t the only kind of meat you can pan sear, you can really do this with any type of meat!
Why is pan roasting chicken thighs the best way to get crispy chicken thighs quickly?
As I mentioned above, pan roasting chicken thighs ensures that you’ll have crispy skin on chicken thighs. Because you start the cooking process in a very hot pan, you jump start it, and it takes less time in the oven than just straight roasting does. There’s a little more active time, but it’s well worth it!
STORING AND REHEATING PAN-ROASTED CHICKEN THIGHS
This recipe makes the perfect meal prep and while it is delicious when enjoyed immediately, it can also easily be made in advance and stored in an airtight container once completely cooled and saved for later. Stays good in the fridge for about 4 days!
OTHER FAVORITE CHICKEN THIGH RECIPES | SHEET PAN OVEN BAKED CHICKEN THIGHS
If you’re looking for an all-in-one meal, you have to try my Sheet Pan Chicken Thigh Dinner with Veggies and a Herby Garlic Sauce, my Lemon Sheet Pan Potato and Chicken Bake or my hot honey grilled chicken thighs. These recipes come together in no time and are always a crowd pleaser!
Print
Pan-Roasted Chicken Thighs (Bone-In)
By pan roasting chicken thighs you get really really crispy skin and juicy and tender meat from bone-in, skin-on chicken thighs.
- Prep Time: 5 minutes
- Cook Time: 35 minutes
- Total Time: 40 minutes
- Yield: 4 servings 1x
- Category: Dinner
- Method: Pan Sear
- Cuisine: American
- Diet: Gluten Free
Ingredients
- about 2.5lbs. bone-in, skin-on chicken thighs (about 4–5 big thighs)
- about 2 Tbsp. olive oil (1 tsp. per thigh), divided
- 2 tsp. paprika
- 1 tsp. garlic powder
- 1 tsp. onion powder
- 1/2 tsp. ground sage
- 1 and 1/2 tsp. salt
- 1/2 tsp. black pepper
Instructions
- Start by preheating the oven to 400F and set your chicken out on the counter to come to room temperature about 20 minutes before you’re ready to cook. This is safe to do and helps with even cooking. Then, Pat the chicken totally dry with a paper towel.
- Mix together all of the spices and seasonings.
- Drizzle each chicken thigh with 1 teaspoon of olive oil and sprinkle an equal amount of the spice mixture onto each thigh. Rub the oil and spices all over the chicken.
- Heat an oven-safe or cast iron skillet over medium-high heat on the stove. Pick a skillet that’s big enough to hold all of the chicken in an even layer with a bit of room between each piece. Once the skillet is hot, add the oil.
- Then, lay the chicken thighs, skin side down in the skillet. Sear them for 5-7 minutes until they are nice and golden brown on top, and then flip them. When you go to flip them, they should give right away. If the chicken is sticking to the pan, it isn’t done searing yet.
- Once the chicken is seared and the skin side is facing up, turn the stovetop burner off and slide the skillet into the oven.
- Bake for about 30 minutes, or until the chicken reaches an internal temperature of 165F. Rest for 10 minutes before serving!
This recipe was originally published April 2020 and was updated October 2024.


Thanks for the recipe. It looks so delicious.
of course!
This looks really good. Can’t wait to try it this weekend! Thanks for sharing this recipe.
hope you enjoyed!
I made this for my GF and she said it was “effing amazing.”
haha I love it!
This is a regular at our house so quick easy and delicious!
YUM! I am so glad you are enjoying this recipe ❤️
Best chicken thigh recipe period. It’s so simple to follow and execute. Make sure that skin is dry and the pan hot before adding your oil. Turns out perfect everytime.
Absolutely perfect. Simple ingredients, super easy to cook and extremely good. It was raining, so I couldn’t grill but I wanted an indoor crispy chicken dinner…this recipe nailed it. Its a keepee!
Turned out pretty good but six minutes on medium high heat with my cast-iron skillet completely burnt the skin.
*edited*
Turned out to taste amazing despite skin being a little too crispy. I’ll do between medium and medium-high next time.
So glad you ended up enjoying this! Cast iron cooking can be tricky as certain brands conduct heat better than others. If your pan is REALLY smoking, it could help to turn the heat down a bit, but I usually don’t have an issue with this recipe. Thanks for the edit!
I must have missed how to reheat chicken thighs. Please reply
This is a winner! You’ve shown a lot of patience with this.
Oh my word,they turned out fantastic! I threw in 4 tiny red potatoes I nuked in the microwave-made a side dish of green beans – yum!
I’m SO glad! Great choice of sides!
Poor commentary — what side of the chicken is placed in the skillet first? Skin down or skin up?
Per the recipe directions…skin side down.
Thank you. I guess I misread the recipe — thank you for replying!
LOOKS SO DELICIOUS! THANKS FOR SHARING! 🙂
Awesome blog. Thanks for sharing positive content.
Thank you for the recipe, cooking it right now for my family 🙂
Omg! I live in Florida and the chicken here sucks, compared to Wisconsin, where I’m from so I buy Perdue Farms organic chicken. I made it per your instructions and it was excellent . The addition of sage was amazing. I made thighs and drumsticks, perfect. My husband is recovering from stomach surgery and could only eat mashed potatoes with gravy from the pan dripping. I will definitely make again for him. Thanks, I usually dontrate anything.5 stars for this!
Ah, Edie! I’m so glad you enjoyed! This makes my day!
Amazing! I love chicken & roasted chicken is my favourite. Thank you for the instructions & recipe;) Really helpful!
So glad you liked them!
Maybe i am missing it, but do you add any oil to the pan? Or just fry as is with the oil that was rubbed on the chicken before seasoning?
Yes, you should add oil before you put chicken in. Just for your reference for future. It does advise that at the end of step 4. Hope this helps. My family & I love this recipe; hope you’ll enjoy it as much as we do.
One of my favorite easy, in-door crispy chicken recipes. The seasoning is perfect including the technique. Amazing recipe! Thank you!
Delicious recipe! My whole family loves it.
Really wish these places clarify wtf they mean when to add the oil when the pan is hot. You wait until it gets to temp and you have an oil fire on your hands.
No oil in the pan at all. It renders nicely from the chicken skin. In cast iron I cook this at medium-medium high so there is no smoke. Then thighs sort of shallow fry in the oven. Skim most of the fat from the pan, add a milk or water and flour slurry for gravy. Yummy!
Really delicious and easy to make. I had no cast iron pan, so I put a glass oven dish into the oven during the preheat, and transferred the chicken to it after the pan-sear stage. Turned out well.
Excellent! I am excited to hear this recipe turned out great for you, Elizabeth! Thank you for your review, it means so much to me!
Fantastic easy mid week dish. Will definitely make this dish again!!
This recipe has spot-on temperatures and cook times! The thighs were thoroughly cooked, yet extremely juicy and had very crispy skin.
Ahh thank you so much, Amy! I am so glad this recipe turned out amazing for you and you are loving it!
FANTASTIC!… Cast Iron skillet is a MUST! 👏🏾👏🏾👏🏾👏🏾
YAY! I am so glad you are loving this recipe, Kathy!
The best crispy juicy chicken I have ever cooked. I skipped the sage, just because I had none. And kept the chicken in the turned off oven for another 30 min before serving. Deffinitelly a family favorite.
YAY! This makes me so happy to hear, Irina. Thank you for giving it a try and for sharing your review + star rating, I really appreciate it!
I must have missed how to reheat chicken thighs. Please reply
Hi! You can reheat in the oven or the microwave, whichever you prefer! Hope you enjoyed this recipe!
Used as a loose guide, but recipes from Allie don’t go wrong.
Ahh thank you SO much, Emily!