I’m showing you How To: Roasted Chicken Thighs (bone-in) to simplify a kitchen staple and give you an easy, healthy meal. The juiciest chicken ever!
You’re meandering through the grocery store, and eventually, you make your way over to the meat aisle. And then you see it “BONE-IN chicken thighs”. Umm…gross. What are you supposed to do, touch bones or something? You don’t know how to butcher a chicken. You pick up a pack of boneless, skinless chicken breasts for double the price and leave the store feeling defeated.
Sound like you? That was me, too!! For some reason, whenever we see bone-in anything it automatically triggers anxiety for some of us. I get it! Are you supposed to remove the bone before cooking? Leave it in? When do you take it out? How do you know if it’s cooked?! The questions are honestly endless. Try my Instant Pot Chicken Thighs for another easy way!
Chicken thigh recipes don’t have to be intimidating, actually they can be super easy and very elegant to serve to guests. My Apricot Braised Chicken Thighs With Traminette Wine & Thyme is one of my favorite non-venison dishes to serve a crowd. My juicy, and tender Sheet Pan Chicken Thigh Dinner With Veggies & Herby Garlic Sauce, it is seriously the most perfect weeknight dinner the whole family will love! My Lemony Sheet Pan Chicken And Potato Bake | With White Wine Butter Sauce is such an elevated dish and loaded with flavor! Also try my Golden Raisin Skillet Chicken Thigh Dinner or learn How to Roast a Whole Chicken easily!

Okay everybody – take a deep breath. I’m going to show you. Even if this is your first time cooking with chicken, you can totally do this. The secret to cooking wonderful roasted chicken thighs (or breasts) is to roast them with skin on and bone in. Trust me on this, you’ll be adding this recipe to your dinner rotation in no time.
WHY BONE-IN , SKIN ON CHICKEN THIGHS?
Because this literally traps the flavor and the moisture so when you’re through cooking, you have an incredibly flavorful piece of meat that is anything but ordinary. When it’s time to eat the chicken, I simply remove the skin and eat around the bone, or, I wait for it to cool and remove the bone and skin by pulling on each gently.
One more thing before we begin – DO NOT THROW AWAY THE BONES AND THE SKIN (if you choose not to eat the skin, which is delicious). I repeat, do not throw away the bones and the skin. Because if you set them aside, you can literally toss them into your slow cooker with scrap veggies, onions, and garlic, fill to the brim with water, add a dash of ACV, and let it sit on low for 24 hours to make chicken bone broth. Like, is that a LIFE HACK or what, people?! Here’s the bone broth recipe I use by Danielle Walker with Against All Grain. This will make about $15 worth of chicken bone broth.

INGREDIENTS AND KITCHEN TOOLS
If you’re looking for a delicious and easy-to-make chicken dish, look no further than bone-in, skin-on chicken thighs. This recipe requires minimal prep time and a handful of simple ingredients that can be found in any kitchen. The combination of bone-in thighs with crispy, golden skin creates a mouthwatering dish that is juicy and full of flavor. Whether you’re cooking for a family dinner or hosting a dinner party, this bone-in, skin-on chicken thigh recipe is sure to impress everyone at the table.
- Skin-on, bone-in chicken thighs
- Smoked Paprika
- Garlic powder
- Onion powder
- Ground sage
- Sea salt
- Black pepper
- Olive oil
Kitchen Tools
Preparing bone-in, skin-on chicken thighs calls for the right kitchen tools to achieve mouthwatering results.Whether you’re a seasoned home cook or a beginner in the culinary world, having the proper tools at your disposal will make all the difference in creating delicious and succulent chicken thighs that will impress even the most discerning palates. Here are some of my must-have kitchen tools for perfectly preparing bone-in, skin-on chicken thighs, elevating your cooking skills to new heights.
STEP BY STEP | SEASON, BAKE AND ENJOY THE EASIEST CHICKEN RECIPE
This recipe seriously takes no time at all to prep and cook. With the perfect blend of spices and cooking them at the correct temp, you will have the most delicious chicken thighs ever!
Step 1: Thirty minutes prior to baking, grab your chicken thighs out of the fridge and allow them to come to room temp. This allows for more even cooking.
Step 2: Preheat your oven to 400 degrees.
Step 3: Get out a baking sheet pan and line it with parchment paper or spray with olive oil cooking spray.
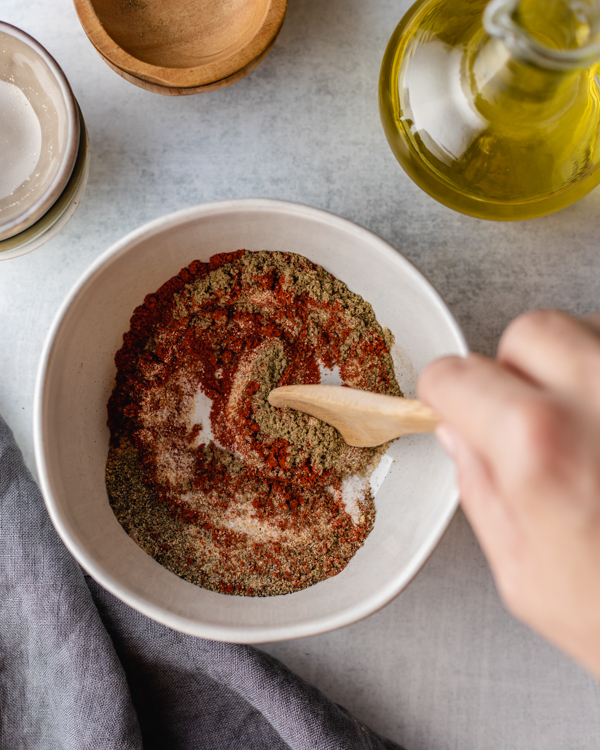
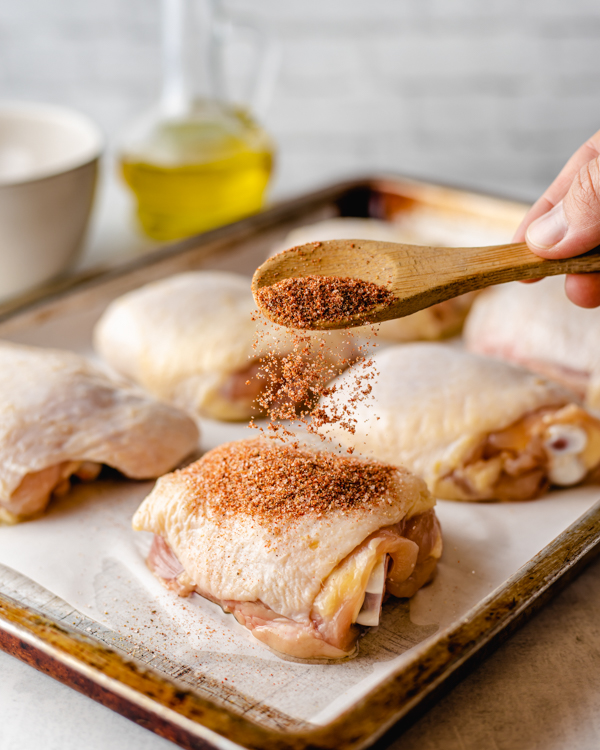
Step 4: Measure all of your spices, salt, and pepper into a small ramekin or bowl. Mix the spice rub together.
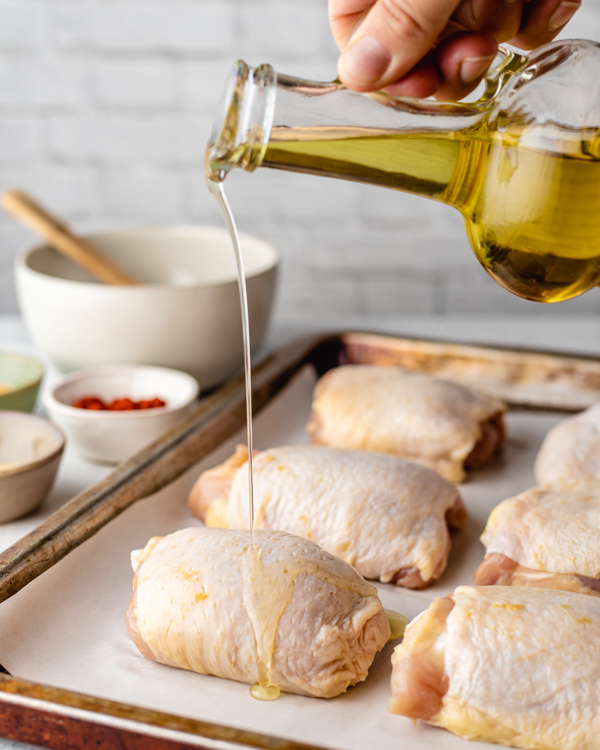
Step 5: Remove your chicken from the package and pat dry with a paper towel. Place chicken thighs on the baking sheet, skin side up and drizzle with olive oil.
Step 6: Next, evenly sprinkle and divide the spice mixture between each piece of chicken, and rub the mixture in, making sure to get a good bit of it under the skin. This will lock in moisture from the oil and flavor from the spices.
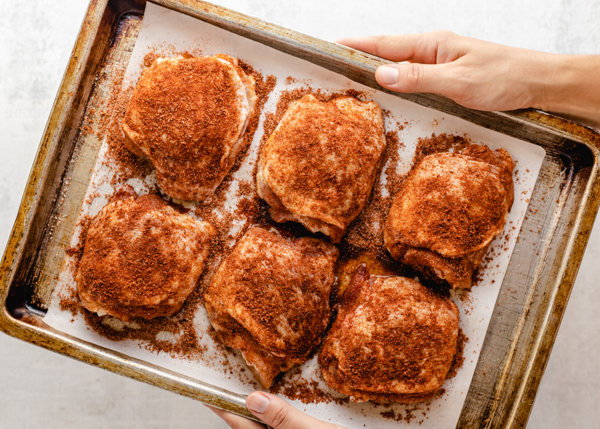
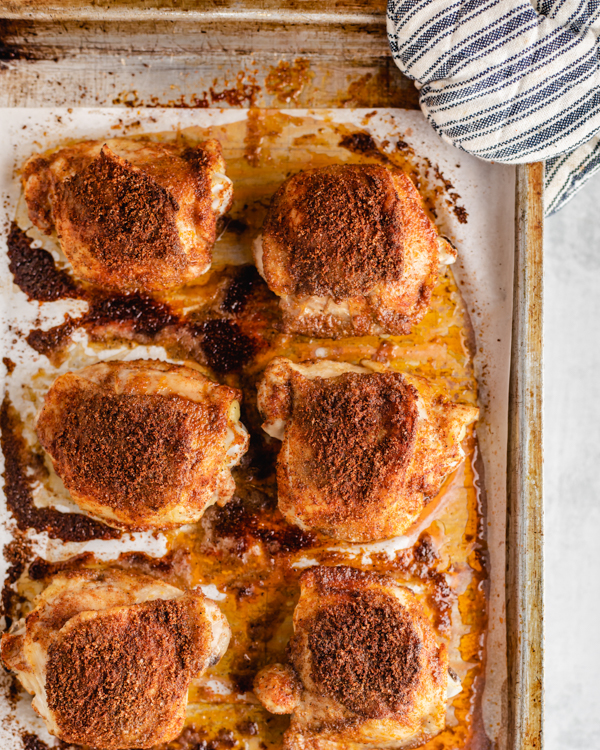
Step 7: Place the chicken into the preheated oven bake chicken thighs for approximately 30-32 minutes or until they reach an internal temperature of 165 degrees. There should be no pink left in the middle. Before cutting or eating the chicken, PLEASE PLEASE PLEASE allow it to rest for around 10 minutes to seal in the moisture you so carefully tried to create.
Step 8: Once you eat or remove the bones and skin, be sure to save them for chicken bone broth!
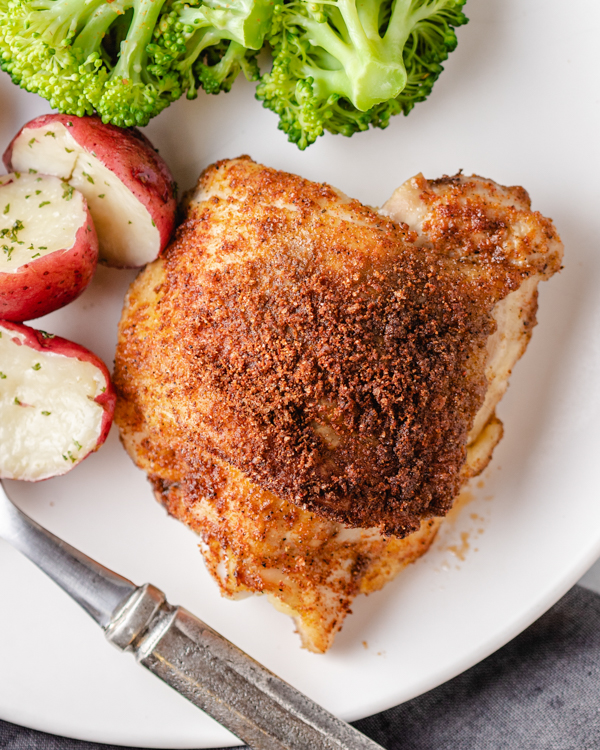
HOW TO SERVE OVEN-ROASTED CHICKEN THIGHS
These chicken thighs are perfect on their own. We love serving them with my roasted scored potatoes, creamy mashed potatoes or a baked sweet potato and a vegetable (i.e green beans, broccoli or even some roasted Brussels sprouts) for a side dish. If I have leftovers, I will remove the bone, slice the chicken up, and use as my protein over salads or roasted vegetables for lunches throughout the week. Pro tip: whip up a quick vinaigrette by mixing, olive oil, vinegar, lemon juice and some salt and pepper. It is fresh and pairs perfectly with this chicken.
STORING AND REHEATING
If you have some leftover chicken thighs, you can remove the bone and store in an airtight container for 3-5 days in the refrigerator. Serve as is, over salads or roasted vegetables for the perfect protein filled lunch.
OTHER ROASTED CHICKEN RECIPES
Want more easy, how-to recipes like this? Try out my Sheet Pan Chicken Thigh Dinner With Veggies & Herby Garlic Sauce, it is seriously the most perfect weeknight dinner the whole family will love! My Lemony Sheet Pan Chicken And Potato Bake | With White Wine Butter Sauce is such an elevated dish and loaded with flavor! Also try my Golden Raisin Skillet Chicken Thigh Dinner or learn How to Roast a Whole Chicken easily!
Print
How To Roast Bone-In Chicken Thighs
I’m showing you How To: Roast Bone-In Chicken Thighs to simplify a kitchen staple and give you an easy, healthy meal. The juiciest chicken ever!
- Prep Time: 10 minutes
- Cook Time: 32 +/- minutes
- Total Time: 0 hours
- Yield: 4 1x
Ingredients
- 1 lb. skin-on, bone-in chicken thighs
- 2 tsp. paprika
- 1 tsp. garlic powder
- 1 tsp. onion powder
- 1/2 tsp. ground sage
- 2 tsp. sea salt
- 1/2 tsp. black pepper
- 1 Tbsp. + 1 tsp. of olive oil – 1 tsp. for each thigh
Instructions
- Thirty minutes prior to baking, grab your chicken thighs out of the fridge and allow them to come to room temp. This allows for more even cooking.
- Preheat your oven to 400 degrees.
- Get out a baking sheet and line it with parchment paper or spray with olive oil.
- Measure all of your spices, salt, and pepper into a small ramekin or bowl. Mix the spice rub together.
- Remove your chicken from the package and pat dry with a paper towel. Lay the pieces on the baking sheet and drizzle with olive oil.
- Next, evenly divide the spice mixture between each piece of chicken, and rub the mixture in, making sure to get a good bit of it under the skin. This will lock in moisture from the oil and flavor from the spices.
- Place the chicken into the preheated oven for approximately 30-32 minutes or until a cooking thermometer reads 165 degrees. There should be no pink left in the middle. Before cutting or eating the chicken, PLEASE PLEASE PLEASE allow it to rest for around 10 minutes to seal in the moisture you so carefully tried to create.
- Once you eat or remove the bones and skin, be sure to save them for chicken bone broth!


I’ve finally been getting past my fear of bone-in meat and I’m so excited about it. I roasted a whole turkey last weekend and I plan to use the bones for broth soon 🙂 Love these “how to” posts!
girl you killed it with this one! one of my favorite ways to stay on budget is to shop the discounted meat in the meat cooler…it’s usually big ol family packs of bone in meat & it helps us save so much money!
WOW. Allie, these are beautiful! I do love working with bone in meat, but it’s definitely not as easy. The bones and skin give it so much more flavor, and I love how you encouraged us to use it to make broth so nothing is wasted.
I am definitely guilty of being intimidated by bone in anything. Thanks for breaking this down and making it seem much easier. And you mastered it – the spices and cooking looks absolutely perfect!
Aww thank you, Sarah! And it is intimidating!
The chicken looks simply divine! I can’t wait to try making it for the family. Thanks!
Nice easy recipe but Bone In was the ONLY way you could get chicken when I was your age. Glad to see a new appreciation for it and the value of the bones for broth. What was old is new again. 😉
So glad you enjoyed the recipe, Martha!
Delish!
So glad you enjoyed!
This looks awesome, I love chicken. I imagine it smells amazing while roasting. Thanks for sharing.
So glad you love them, too!
ROASTED CHICKEN THIGHS is great! To be honest, I’m not good at cooking but I like them, they give me joy and excitement every time I finish the dishes, which is a great thing. With your recipe, just need to follow the instructions and the rest is simple, thank you for sharing them.
Glad you enjoyed!
I never comment on a recipe, however you must know that this is the BEST CHICKEN RECIPE EVER!
I love bone-in, skin on thighs,…. the seasoning, & cooking method is perfect! (I do add 1/2 tsp turmeric) I bake mine on 375 convection roast, but have also cooked at 400 per your recipe. Either way the dish turns out perfect every time! Also works great for chicken legs !
Thank you!
Oh, I need to try with legs, what a fabulous idea!! I love your addition of turmeric, what beautiful color they must have. Thank you for commenting!
Quick and easy for a weeknight! Thanks for the recipe and the beautiful photos!
These are some great tips! And you’ve got it right; it makes a massive difference. Choosing the right Gas Range For Home Chef can be pretty tricky, but this guide made it a lot simpler! Thank you so much for writing; this was helpful!
You’re welcome!
This looks so delicious and yummy food recipe. Such an amazing and wonderful reading article for me as I’m trying to learning new recipes by reading some blog article. I always enjoy your all article. Thank you for sharing this.
Thanks For Sharing this Amazing Recipe. My Family Loved It. I will be sharing this Recipe with my Friends. Hope They will like it.
Great recipe ! The only thing I would add is to be prepared for a much longer baking time depending upon the size of the chicken thighs. Mine took just over an hour to be done. They turned out delicious!
Interesting! This can vary due to bird size, but glad you enjoyed them!
Hey guys am rate this recipe after tried it at home
You made our last diner full of LOL
Thank you so much
Once you’ve done making bone broth, put skins in oven and bake for about 20 minutes for the most delicious chicarrones
wow, this looks so appetizing. i just love roasted chicken thighs . i must want t try this. thanks for sharing this amazing article and recipe of roasted chicken thighs.
Just made this last night and it’s def my go to roasted chicken recipe now! Ate it with some roasted chicken rice I had in the pantry and broccoli and my bf loved it too. I added a little bit of lemon pepper as well and a pinch of cayenne and it turned out so good. I shredded it and then used it today on an Asian sesame salad and it was amazing!
YUM! sounds absolutely delicious, Esther. Glad these are a hit and they turned out amazing for you!
How much chicken bones do you need to make chicken bone broth? Also can you tell me how to do it?
This looks awesome & the recipe is super easy & quick. Thank you for sharing;)
This recipe is amazing & a perfect serve for dinner. Thank you for sharing;) Looking for more such recipes!
Great recipe ! The only thing I would add is to be prepared for a much longer baking time depending upon the size of the chicken thighs. Mine took just over an hour to be done. They turned out delicious! i just love this.
You can explain very well. Chicken Thighs is one of the most favorite dishes.
This recipe was so easy and delicious. I made it exactly as described. I also took a chance and put some cauliflower covered with a crunchy coating in the pan with the chicken. I used a shallow metal baking pan with one inch sides. I was prepared for it to take longer with the cauliflower and chicken on the pan together. But at 400 and in just 30 minutes, it was all done perfectly! Easy peasy!
Amazing recipe! The flavor was great. Have yet to find one of Allies recipes that my family doesn’t love! Thankyou!
Yum, made it and it’s a keeper!
Yay! So glad you’re loving this recipe, Diana!
Love the easy peasy delicious recipe and bone broth to boot! 🙏🙏
So glad I found this recipe! Thighs were juicy and perfectly cooked. I let them roast about 35 minutes and cracked the oven to let them rest 10 minutes. Thanks!
YUM! Glad these turned out amazing for you, Angie!
I baked 3 bone-in Chicken Thighs using this recipe. I seasoned them by this recipe a few hours before baking them. Only wish I had baked them a little longer. They were up to temp but still tough and hard to debone. However, once they were done I let them rest, deboned them and used them in chicken green chili enchiladas. They were amazing!! I’ll absolutely be making chicken again using this recipe! Thank you so much!
YUM! Sounds absolutely amazing, Susan. I am so glad you gave this recipe a try and it turned out fabulous for you!
I made this today and it is Deee-licious! Thanks for sharing this recipe 🙂
YUM! One of our all time favorites. I am so glad you are loving it too. Thanks for your review & star rating, I appreciate it!
Love these recipe! So tasty and juicy, even if you take the skin off after baking! Definitely my go-to from now on.
YAY! I am so glad you are loving this recipe and it turned out amazing of you, Rhonda. Thanks for sharing your review & star rating, it means so much to me!
Yummy as always!!
This was terrifically easy and so delicious. I have a different set of spices I am going to try next with this method. So good.
Amazing! I am so glad you are loving this recipe, Jonathan. Thanks for sharing your reiew & star rating!